
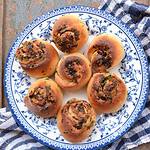
Garlic rolls are easy bread rolls made with garlic, butter and herbs and can be baked and served for any meal. These can be made from frozen dough too.
I have restarted baking. This had got paused due to some unknown reason. But I am back to it. Thought of baking rolls from pizza dough itself. Let us see step by step photos to make garlic rolls from scratch.

Whenever I bake anything, my family keeps asking for more. This is a tasty garlic bread rolls recipe which can be made for any meal – breakfast, lunch or dinner.
We can bake bread in microwave or OTG. I have tried baking it both ways. You don’t need a special machine to make these. You can prepare the dough with hands or a food processor too.
Related posts: Pav (Bread) , Homemade veggie pizza, Savory corn cheese muffins
For making garlic bread rolls with yeast we need the following:
- All purpose flour – If all purpose flour is not available, you can use maida.
- Active dry yeast – for baking bread I always use this.
- Garlic – I have used 2 tablespoon minced garlic in this recipe. You can even use garlic paste.
- Butter – We need very less butter in this recipe. It is mixed with garlic and then spread on the dough.
- Red chili flakes and oregano – Red chili flakes are sprinkled over the dough.
- Sesame seeds – use these for garnish. This is optional.
- Coriander leaves – This is used for garnish. You can use parsley too.
Step by step instructions to bake easy bread rolls from scratch:
- Mix butter and minced garlic and keep aside.
- Warm ½ cup water and when it is slightly warm, add yeast and sugar to it.
- In a mixing bowl, add flour and yeast water. Add salt and little oil to it.
- Keep on molding the dough till it becomes slightly elastic.
- Once this is done, keep the dough covered for 1 to 2 hours and watch it rise.
- Once it rises and becomes almost double, punch the air from the dough and mold it slightly.

- Use the rolling pin and spread the dough into 1/2 inch thick rectangular circle.
- On this spread the butter and garlic, oregano seasoning, coriander leaves and red chili flakes.
- Now roll this gently from one end to the other.
- Cut this roll into 6 or 7 parts.

- Grease a baking tray with butter and flour and keep these rolls in a line.
- Apply butter and remaining garlic spread to the top of the rolls and sprinkle the sesame seeds.
- Again let the rolls rise for 20 minutes before getting baked.
- Pre-heat the oven at 180 C for 5 minutes. Place the baking tray containing the garlic rolls in the microwave or OTG.
- Bake for 20-22 minutes at 180 C or till the garlic rolls become golden brown.

These soft inside bread rolls can be served with any dip or curry. I love to eat it simply as soon as it is baked.

How can this recipe be made from frozen dough?
If you make the dough, you can cover and let it rise in fridge for 24 hours. Next day you can make rolls.
You can even prepare the dough and make rolls and keep in fridge. Just keep it out for 10 minutes before baking.
Garlic Bread Rolls
Equipment
- OTG
- Mixing bowl
- Spatula
Ingredients
For the dough:
- 1 1/2 cup All purpose flour maida
- 1/2 cup warm water
- 3/4 tablespoon active dry yeast
- 1 teaspoon salt
- 1 tablespoon sugar
- 1 tablespoon + 1 teaspoon oil
For garnish:
- 1 tablespoon sesame seeds
For the spread:
- 1 tablespoon garlic paste
- 2 tablespoon’s butter
- 1/2 tablespoon red chilly flakes
- 1 tablespoon chopped coriander leaves
- 1 tablespoon minced garlic
Instructions
- Warm the water and when it is slightly warm, add yeast to it..
- Mold the flour with the yeast water. Add sugar, salt and little oil to it.
- Keep on molding the dough till it becomes slightly elastic.
- Once this is done, keep the dough covered for minimum 1 hr and watch it rise.
- Once it rises and becomes almost double, punch the air from the dough and mould it slightly.
- Use the rolling pin and spread the dough into 1/2 inch thick rectangular sheet.
- On this spread the butter, garlic paste,coriander leaves,minced garlic and red chilly flakes.
- Now roll this gently from one end to the other.
- Cut this roll into 5 or 6 parts.
- Grease a baking tray and keep these rolls in a line.
- Apply butter and remaining garlic spread to the top of the rolls and sprinkle the sesame seeds.
- Again let the rolls rise for 20 minutes.
- Pre-heat the oven at 180 C for 5 minutes. Place the baking tray containing the garlic rolls in the microwave.
- Bake for 20-22 minutes at 180 C or till the garlic rolls become golden brown.
- Serve hot, serve with love!
Notes
- If you make the dough, you can cover and let it rise in fridge for 24 hours. Next day you can make garlic rolls.
- You can even prepare the dough and make rolls and keep in fridge. Just keep it out for 10 minutes before baking.
- You can even use garlic powder in this recipe.
Follow us on Facebook, Twitter, Instagram and Pinterest.
Pin this image on Pinterest. If you like the recipe, please give us a 5 star rating.

Note: The recipe was published on 13-Aug-2011. It has been republished with step by step images.

Love these flavorful and yummy looking rolls
Flavourful rolls looks damn tempting, happy Raksha bhandhan..
So good to this that this recipe has become such a hit!!
delicious looking garlic buns looks wonderful
Wow perfect garlic buns,luks delicious…
Wow wat a tempting clicks,looks yummy and delicious….
Fantastic garlic rolls!
Yum Raksha, they look delicious 🙂
Wow!Perfect Bake.Nicely Done Garlic rolls Dear.Luv it.